
Showing posts with label photography. Show all posts
Showing posts with label photography. Show all posts
Wednesday, September 30, 2009
Wednesday, June 10, 2009
Bird photos with new lens
My new toys arrived today! As soon as I got home from work I opened up the boxes containing my new 70-200mm lens and the 1.4x extender and slapped them on my camera. Well, first I attached the UV filter to protect my nice new lens. I attached the lens hood, took a quick peek at the owners manual to see which Image Stabilization setting to use, and headed out onto the deck. My yard is home to a lot of birds and this young fellow came right out to see why my cats seemed to think the deck belonged to them (I think maybe he’s not too smart yet)!


Tuesday, April 14, 2009
Success!!
The graphics card for my new monitor finally arrived and now my 22" widescreen looks fantastic! The colors in my photos, like the one below, are really popping now! Installing the card was super easy and once I got the drivers downloaded, bingo! I have so much more S P A C E to work on my photographs now. Yay!
__________________
Now remember, my GIVEAWAY ends 4/15/2009!!!
Click the link below to enter now!
http://boutiquebybonnie.blogspot.com/2009/03/tax-relief-giveaway.html
Photo: Pewitt's Nest near Baraboo, WI. Copyright 2008 Bonnie Stotz
Tuesday, March 17, 2009
Forest and Sea
Last weekend I returned to my roots and made this 100% beaded necklace. Lately I've had the 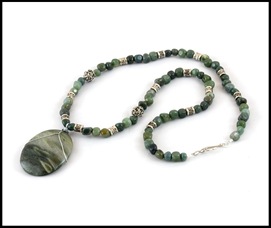

This necklace reminds me of that trip. The tumbled pebbles of moss agate represent the forest and the beach while the large seaweed quartz pendant evokes the cool April sea. The pendant was pretty, but plain, so I added just a touch of wire wrap to give it a more artisan look. I hope the wearer of this necklace will think of smooth stones under bare feet and the cool breeze of a shaded forest or a deserted beach in April.
Morning Seabirds,Trinidad, CA
Saturday, March 14, 2009
New- Vintage Camera Pendants!
I love photography and I have a small vintage camera collection. I’ve been wanting to bring this

Thursday, February 19, 2009
I got a package today!

I love coming home and seeing a package waiting for me! Today it was a box from Fire Mountain Gems and inside was my new jewelry display bust! She’s 19” high and has a pierced ear so people can finally see how my earrings will look on an (almost) actual ear. She’s so sculptural and elegant I won’t mind leaving her out 24/7. I should probably give her a name so let me know if you have any suggestions!
Now the big question, do I RETAKE all the photos in my etsy store using the new bust? I can tell you the answer is “No” for now. Think 90 items times an average of four photos each… I don’t have the time or energy! I do hope to give my store a more consistent look over the next year as I combine this display with just one or two backgrounds. If I decide to retake photos at some point, I’ll hold an “Inventory Reduction Sale” first or have a Trunk Sale for my coworkers.
Now what to name her? Maybe something French…
Sunday, February 15, 2009
Editing Photos for Etsy
Here’s part two of my photography workflow – post processing. As I said in my last post, you must edit every single image you plan to use online. I use Adobe Photoshop but there are tons of less advanced programs out there that make adjustments pretty simple.
Almost every photo needs a few basic tweeks. Of course, the better image you capture, the less work you’ll need to do in the computer.
First, most photos will need to be cropped. Remember that Etsy crops your main photo to a square for the previews. Either crop your original photo to a square, or make sure the focal point of your image will still be visible in square format (see below).


After cropping I adjust the levels (brightness/contrast) and resize and sharpen the image for web display. I may also use the clone stamp to get rid of tiny spots or cat hair showing up. These basic tools should get you started.
Resizing Notes: I start with large images (raw format) so resizing is always my last step. My Image Size box has two fields that I change. The first is pixels per inch (Resolution). The standard screen resolution used to be 72 ppi, but Windows now uses 96 ppi so I’d go ahead and use 96. Anything higher than 96 is overkill for images on the web.
The second field is width (let the height take care of itself). Etsy recommends 1000 pixels wide, but they will display only 430 pixels wide in your listing. If someone clicks on your image, the larger version will pop up. I never save my images at 1000 wide. I generally go for 600-800 pixels wide because I want my images to load faster. Just keep it above the 430 pixel minimum. Again, Height will take care of itself. After resizing I sharpen the image using unsharp mask.
If I have to reduce an image by more than 50% I will do it in two stages. I’ll reduce it by half, sharpen it, then reduce to my final size and sharpen it again. That’s what works for me, anyway, to maintain quality.
Finally, I save my image as a JPEG (.jpg). I’ll choose the highest quality setting that will produce a small enough file size for the web (under 100K). My SAVE dialog box shows me the file size as I move the quality slider. This is why I don’t use 1000 pixel wide images. I prefer quality over size! Do not keep resaving a jpg image over and over. It’s a compressed format and you’ll lose quality.
Filenames: I suggest you “Save As” another filename so your original remains intact. I use a simple naming format that starts with a letter (B for bracelet, N for necklace) followed by a number and then a letter. For example, if I use three photos for my first necklace the files are N001a.jpg, N001b.jpg and N001c.jpg.
That’s all for today! I hope this has been helpful to some of you and I thank the rest of you for reading through it! Leave me a comment if you have a question on something and I’ll comment back.
Saturday, February 14, 2009
My Tabletop Photography Set-Up
Today I’m giving you a peek behind the scenes of my Etsy store to show you how I photograph my items. One of the most asked questions on Etsy is “How can I take better photos of my items?” First, you need to have a decent understanding of photography and know how to use your camera. I’ll leave that up to you for now. Second, you need to control your light to achieve consistent color balance and exposure. That’s where an inexpensive tabletop studio can help. I only spent about $70 on mine, including the CFL light bulbs.

My equipment consists of:
36” light tent : The purpose of the tent is to diffuse the light. They come in all sizes and mine is fairly large. I purchased the tent alone, not as part of a kit, because I wanted to use my own lights. I got mine on Ebay.
Lights: I use two clamp lights with 100 watt daylight balanced CFL bulbs. Do not use regular fluorescent or incandescent bulbs. Supplemental light comes from the chandelier above the table and the window behind my set-up. I just clamp the lights on the backs of my dining room chairs and move them as needed.
Backdrops: The tent came with various colored backdrops and I always keep the white one attac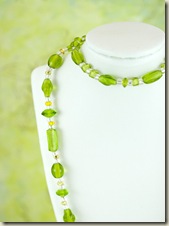
Digital Camera: Mine is a DSLR (Canon 50D) paired with a 100mm macro lens. Buy the best quality camera you can afford but don’t worry if it’s a point and shoot. You should always have your camera on a tripod and use macro mode (flower symbol) for small objects. If you can manually focus and set a custom white balance, that’s even better. Use the highest quality setting available in your camera and do not use flash. I can’t give a photography lesson here, but read your manual and get to know all the settings on your camera. Click here for an excellent website with digital photography tips and articles for beginners.
Tripod: Necessary for the sharpest image possible.
That’s my whole equipment list! With this set-up I can photograph many items in a short period of time. Then it’s on to… POST PROCESSING! Yes, you must do some photo editing on every single photo you plan to use. Tomorrow I’ll post some tips on how process and size your photos for use in your Etsy store.
Wednesday, February 4, 2009

Thursday, January 15, 2009
Postcard from the Plains

The old barn still stands, though its paint is fading, it’s roof is sagging and the old weathervane has finally fallen. It stands in silent memory of the prize Herefords that once filled its stalls. The chicken coop, 20 feet away, has collapsed to little more than a roof lying on the ground. And the sod house, the first home to the young pioneering family that came to tame the land, humbly sits in its original spot, marking the years.

Later, a new farmhouse was built to accommodate the growing family. The children grew along with the garden behind the house, and eventually left to start families of their own. After the youngest son married, his widowed mother moved to town. And the ranch has been empty ever since. She rarely visits anymore. At 82, the abandoned homestead only brings her pain. Pain for the life that it once held. A time when the family worked together to keep the farm running. A time when her sons tinkered on cars and her daughter sewed dresses to wear to school. A time before the bats took over her family’s home.
And the old barn still stands, keeping watch, waiting on an uncertain future. Or perhaps it’s a certain one. No man-made thing dares to defy the relentless weather of the plains forever.
Subscribe to:
Posts (Atom)


 Posts
Posts


